Installation Process
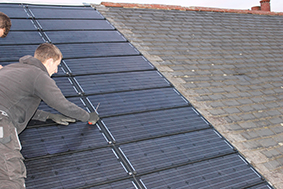
The installation process requires the installation area to be battened to specific spacings. These Battens are then used to fix a frame and flashing onto the roof. Having installed the framework the Stealth energy Tiles are installed by overlapping the tiles and lining up the holes in the Stealth Tiles. A large flat headed screw then fixes the overlapped tiles to the frame below.
For the full installation process, please refer to the Stealth Tile Mounting Installation Manual (Click to View)
(Click to View)Installation demonstration videos are available for additional support:
Installation Guide
The Stealth Energy PV mounting system has been accredited to MCS012. This means it has be tested in the BRE Testing facility for Wind uplift, Weatherproofing and Fire resistance. Full details of these test reports are available if you wish to confirm any data for an installation.
The Stealth Energy PV Tiles are designed to integrate with most standard roof coverings. Contact the head office for additional confirmation regarding any non-standard roof coverings.
Area Planning of an installation
A full plan and design of the proposed installation area should be carried out prior to ordering a system. Help and assistance in this process can be provided by Infinity Innovations Ltd.
The tiles are overlapped when installed in a vertical column in order to give the same visual effect as a standard roof. Therefore this overlap will reduce the required installation area and must be allowed for.
Specific flashing is part of the mounting system, and allowance must be made for this at the top and bottom of each column. There is also flashing which runs down the sides of the installed tiles which must be considered, although they are fully covered by the Stealth PV Tile and the roof covering once the roof covering is reinstated.
The MCS has specific requirements as to the gap which must be present around the outsides of an installation, so in this and all matters the guidelines of the MCS will need to be followed in order to qualify for Feed in Tarrif.
Electrical Planning of an installation
- Stealth XT 50-12M Specification – Stealth PV Tile XT 50-12M Datasheet(Click to View)
The Stealth Energy PV Tiles have standard MC4 connectors on the back exactly as you would find on a standard PV panel. As part of the planning you must calculate (Infinity Innovations will assist with this) how many strings your installation will require. Accordingly it is advisable to create a diagram showing how the tiles are to be linked, and the point of entry into the roof space of the cables.
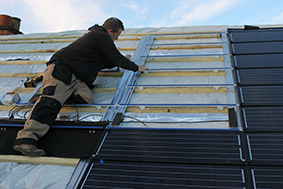
Installation Process
The required area needs to be battened to the exact spacing required by the Stealth Tile Mounting Installation Manual(Click to View). Ensure that the battens used are 50mm width. A Jig is provided to make accurate and swift installation of the Battens. Where there are existing battens in place they can be left as they are, with new battens installed as required. If there is a conflict as to a particular spacing then simply butt a batten to the existing one and continue to measure the exact spacings.
(Click to View). Ensure that the battens used are 50mm width. A Jig is provided to make accurate and swift installation of the Battens. Where there are existing battens in place they can be left as they are, with new battens installed as required. If there is a conflict as to a particular spacing then simply butt a batten to the existing one and continue to measure the exact spacings.Ubiflex (Click to View) lead substitute is used to run along the bottom of each column as the bottom flashing. Each column has a specific part at the bottom – Starting Row Bar – and then a lighter bar is installed on each batten going up the roof, one bar per Stealth Energy Tile. Flashings with side foam is installed vertically as ‘hidden gutters’ as an additional weatherproofing to the installation.
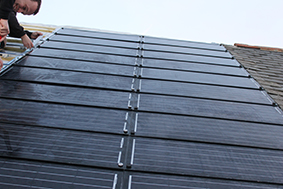
(Click to View) lead substitute is used to run along the bottom of each column as the bottom flashing. Each column has a specific part at the bottom – Starting Row Bar – and then a lighter bar is installed on each batten going up the roof, one bar per Stealth Energy Tile. Flashings with side foam is installed vertically as ‘hidden gutters’ as an additional weatherproofing to the installation.Once the frame and flashing are in place the Top Flashing and tiles are installed. The top flashing ensure a physical weatherproof barrier between the roof covering above each column and the Stealth Energy tile. This part locks in place through the pre-drilled holes in the Stealth Tiles.
The Stealth Tiles are then installed from the top of each column downwards, by overlapping Stealth tile over Stealth Tile and fixing through with a large flat headed screw into the frame below.
Lastly there are additional Edge Flashings which provide a physical barrier to and sideway driving rain.
The tiles are finished with silicon between all gaps giving a complete waterproof seal.
PV TILE SYSTEM ENQUIRY
Call us on
+44 (0) 8444 930088